
Hardware virtualization is a fundamental processor capability that frequently remains unnoticed until a user attempts to deploy specialized, high-performance software layers. If you run Android development emulators, configure isolated sandboxes in VirtualBox, orchestrate containers via Docker, or instantiate Linux kernels through Windows Subsystem for Linux (WSL2), your initialization scripts will abruptly halt if this silicon feature is dormant.
The system breakdown typically manifests as an explicit error notification stating that Intel VT-x or AMD-V is disabled inside the system firmware. Modern laptops possess immense computational potential, but without activating this hardware abstraction engine, hypervisors are forced to rely on slow software translation layer methods. This architectural bottleneck can degrade performance by over 80% or entirely prevent virtualized subsystems from launching.
Activating this configuration requires modifying settings outside the standard Windows operating system environment. This guide provides a detailed walkthrough to safely navigate your laptop firmware interface, adjust the exact hardware registers, and verify execution across major hardware manufacturers including HP, Dell, Lenovo, and Acer.
What Is Hardware Virtualization?
At its architectural foundation, hardware virtualization is a dedicated hardware feature built directly into the silicon of modern central processing units. This extension allows a single physical processor to behave like multiple independent, isolated logical CPUs simultaneously. It bridges the gap between physical execution units and guest operating systems, allowing multiple environments to share hardware resources safely without interfering with each other.
Intel and AMD implement this capability through distinct proprietary engineering designs:
- Intel VT-x (Intel Virtualization Technology): Introduced to provide hardware-assisted virtualization extensions for the x86 architecture, minimizing software translation overhead.
- AMD-V (AMD Virtualization): AMD implementation engineered to optimize guest operating system execution directly on the silicon layer.
In practical terms, instead of relying on a slow, software-driven emulator to translate every command from a virtual computer down to the physical motherboard, the software communicates directly with the real CPU. This silicon support ensures near-native execution speeds for nested environments, making complex enterprise development pipelines and software testing environments possible on standard consumer laptops.
Why Hardware Virtualization Is Needed
Activating hardware virtualization is an absolute requirement for running modern infrastructure tools, sandbox testing software, and resource-heavy development applications. Without this hardware flag enabled, hypervisors cannot manage memory pages or schedule processor tasks cleanly.
You will typically require this extension enabled when deploying specific operational environments:
- Developing or testing applications inside modern Android emulators like BlueStacks, LDPlayer, or the official Android Studio emulator.
- Provisioning isolated network nodes and legacy operating systems inside VirtualBox or VMware Workstation.
- Orchestrating lightweight microservices and application configurations using Docker Desktop.
- Running Linux developer utilities directly alongside Windows infrastructure via WSL2.
When the CPU extensions are disabled, the hypervisor software cannot access the necessary hardware acceleration layers. This leads to immediate system errors, such as notifications stating that Hyper-V is unavailable, virtualization is disabled in the BIOS, or that the system lacks VT-x support. Enabling this setting removes these software blocks and allows the hypervisor to manage resource distribution efficiently.
How to Check if Virtualization Is Already Enabled in Windows
Before initiating a system restart to enter the firmware configuration space, you can quickly verify the real-time operational status of your processor extensions directly through native Windows monitoring tools.
To check the current status using the Windows utility panel, follow these steps:
- Press the key combination Ctrl + Shift + Esc simultaneously to open the system Task Manager.
- Click on the Performance tab located on the sidebar or top menu navigation bar.
- Select the CPU section from the list of monitored hardware components.
- Locate the specific diagnostic line labeled Virtualization near the bottom right of the display window.
If the status indicator explicitly displays Enabled, your processor is already configured to support nested hypervisors, and no further adjustments are necessary. If the diagnostic indicator reads Disabled, the operating system is locked out of those hardware registers, and you must manually enter the motherboard firmware environment to change the setting.
How to Turn on Hardware Virtualization (Step-by-Step Method)
Modifying hardware virtualization parameters requires accessing the pre-boot firmware environment, commonly known as the BIOS or UEFI. Because this layer initializes before the Windows kernel loads, changes cannot be executed inside the desktop operating system interface.
Step 1: Restart Your Laptop
Save all active development files, close running software programs, and navigate to the Windows Start Menu. Click the power icon and select Restart to begin a clean system boot sequence.
Step 2: Enter BIOS/UEFI Menu
As soon as the laptop display panel turns off and illuminates again, you must repeatedly tap the manufacturer-specific hardware key before the Windows loading logo appears on the screen. If the operating system starts loading normally, you missed the entry window and must repeat the sequence.
The specific hotkeys required to interrupt the boot process vary significantly by manufacturer:
- HP: Tap the F10 key continuously, or tap Esc to open an intermediate menu followed by F10.
- Dell: Tap the F2 key rapidly when the blue logo appears.
- Lenovo: Tap F1 or F2 repeatedly, or utilize the Fn + F2 combination on specific thin-profile models.
- Acer: Tap the F2 key or the Delete key immediately upon powering up.
Step 3: Locate Advanced Settings
Once inside the text-based or graphical firmware interface, your standard mouse cursor may not function. You must navigate the menus using the keyboard arrow keys, using Enter to open options and Esc to return to previous screens. Browse the top menu bar to locate advanced hardware categories, which are typically labeled as Advanced, System Configuration, Configuration, or CPU Configuration.
Step 4: Find the Virtualization Option
Scroll down through the sub-menus to locate the exact toggle switch governing your processor’s virtualization extensions. The exact nomenclature changes depending on whether your laptop runs an Intel or AMD processing chip.
Look for these specific labels within your firmware screen:
- Intel Virtualization Technology
- Intel VT-x
- SVM Mode (Secure Virtual Machine on AMD systems)
- Vanderpool (Legacy naming scheme on older motherboards)
Step 5: Enable Virtualization
Highlight the setting line using your keyboard arrow keys and press the Enter key or spacebar to open the state selection prompt. Change the value from its default Disabled position to Enabled. If your Intel system features a separate line labeled Intel VT-d for direct I/O virtualization, it is best practice to enable that option as well to support advanced device passing.
Step 6: Save Changes and Exit
To finalize the modification, you must explicitly commit the changes to the non-volatile motherboard memory before restarting. Press the F10 key to trigger the global save-and-exit prompt, or navigate manually to the Exit tab and select Save Changes and Reset. The laptop will automatically initiate a final reboot cycle and load into the Windows desktop environment with the new hardware settings active.
Brand-Specific BIOS Paths (HP, Dell, Lenovo, and Acer)
Because motherboard vendors utilize highly customized firmware layouts, the precise location of the processor switches varies across different hardware brands. Navigating to the correct toggle screen requires matching your specific brand to its exact structural directory tree.
HP Laptops
To modify settings on an HP system, initialize the boot interruption sequence using the F10 key to display the unified firmware menu. Use the right arrow key to move away from the main system overview screen and select the System Configuration tab.
Scroll down through the configuration list to find Virtualization Technology. Press the Enter key, toggle the state value to Enabled, and press F10 to save the configuration and exit the environment.
Dell Laptops
Modern Dell Inspiron, Latitude, and XPS laptops typically deploy a graphical interface known as Dell BIOS or Dell Lifecycle Controller. Once inside using the F2 key, navigate to the sidebar menu on the left side of the screen.
Expand the Advanced or Virtualization category folder to display the underlying settings checklist. Select the line item labeled Virtualization, look for the specific checkbox or radio button marked Enable Intel Virtualization Technology or SVM Mode, ensure it is checked, and click the blue Apply Changes button before exiting.
Lenovo Laptops
Lenovo ThinkPad and IdeaPad machines place their CPU configuration choices within their dedicated structural sub-menus. Interrupt the boot flow using F1 or F2 to enter the layout.
To update these settings on Lenovo hardware, follow this exact structural sequence:
- Select the Security header menu located along the top or side navigation track.
- Scroll down to select the Virtualization sub-menu and press Enter.
- Locate Intel Virtualization Technology or AMD SVM Mode and toggle the field to Enabled.
- If present, locate Intel VMD Technology or VT-d and verify its active status based on your development needs.
Acer Laptops
Acer systems generally feature a simplified text layout that restricts cursor tracking, requiring strict reliance on keyboard arrow keys. Enter the environment using the F2 key during startup.
Navigate directly to the Advanced tab or the Main menu bar. Locate the configuration row named Intel Virtualization Technology or SVM Mode, change the active string parameter to Enabled, navigate to the Exit column, and select Save Changes and Exit.
If You Don’t See the Virtualization Option
If you thoroughly search your laptop firmware panels and cannot find an explicit virtualization toggle, it does not necessarily mean your laptop cannot support hypervisors. Several underlying hardware configurations or firmware safety locks can hide these entries from view.
1. Verify CPU Support
Older entry-level processors or budget-focused mobile chips may lack the physical hardware execution units required to support nested computing layers. You can verify your exact chip capabilities by noting your CPU model number from the Windows Task Manager and referencing official manufacturer databases, such as the official Intel Product Specifications (ARK) index or the AMD Processor Specifications ledger. If your silicon lacks physical VT-x or AMD-V execution paths, software emulation is your only alternative.
2. Disable Secure Boot Restrictions
Certain manufacturing security profiles lock down specific hardware registers to prevent boot-level rootkits from manipulating low-level system settings. If your virtualization toggles are grayed out or missing entirely, navigate to the Boot or Security tab inside your firmware panel and temporarily disable the Secure Boot feature. Save the setting, restart the laptop directly back into the firmware environment, and check if the processor configuration options are now unlocked.
3. Update the Motherboard BIOS/UEFI
Hardware manufacturers frequently release firmware updates to address system stability issues, patch architectural security vulnerabilities, and unlock hidden processor capabilities. If early factory firmware builds omitted the virtualization menu entry, flashing your motherboard to the newest verified firmware version from the manufacturer’s official support portal can restore the missing configuration options.
How to Verify After Enabling Virtualization
Once your laptop completes its final reboot sequence and initializes the standard Windows desktop, you should explicitly verify that the hypervisor layer can successfully access the newly opened silicon pathways.
To run a final configuration check using native administrative tools, follow these steps:
- Right-click on the Windows Start button or press Windows Key + X to open the Quick Link menu, and select Task Manager.
- Navigate to the Performance tab and highlight the CPU monitoring panel.
- Verify that the Virtualization status readout now reads Enabled.
Alternatively, advanced developers can verify the configuration using the Windows Command Prompt or PowerShell. Open an administrative command terminal, type systeminfo, and press Enter.
The tool will scan your system and display a detailed hardware profile. Scroll down to the bottom section labeled Hyper-V Requirements to review the processor flags:
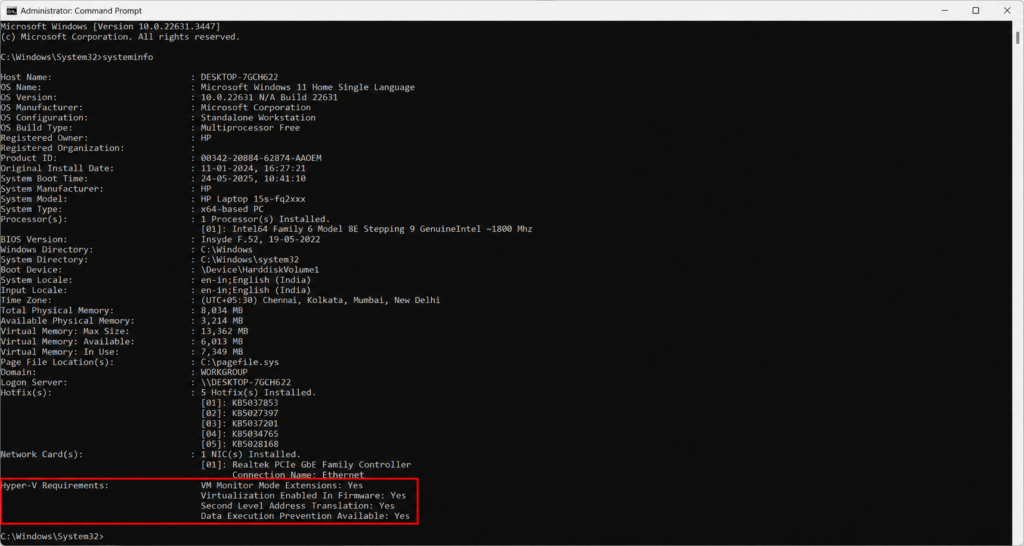
If the entry for Virtualization Enabled In Firmware explicitly confirms a Yes status, your development stack, container engines, and sandbox environments can now access native hardware-accelerated processing speeds.
Common Problems Users Face
Even when following standard configuration paths, background Windows features or input latency issues can occasionally disrupt the configuration process.
1. The BIOS Interruption Key Fails to Register
Modern laptops utilize Solid-State Drives (SSDs) and rapid boot protocols that initialize hardware in fractions of a second, leaving an incredibly small timing window to press your entry key. If tapping the key repeatedly fails and the laptop boots straight to Windows, hold down the Shift key while clicking Restart in the Windows power menu. This forces the system into the Windows Advanced Startup Options screen, where you can navigate to Troubleshoot followed by UEFI Firmware Settings to reboot directly into the motherboard panel without hitting a hotkey.
2. The Configuration Setting is Active but Emulators Still Return Errors
If the Task Manager confirms virtualization is active but tools like BlueStacks or VirtualBox continue to show error prompts, you likely have a software conflict with native Windows virtualization features.
Tools like Hyper-V, Virtual Machine Platform, and Windows Sandbox lock the CPU’s virtualization registers exclusively for system use, preventing third-party hypervisors from accessing the hardware. To fix this, search for Turn Windows features on or off in the Start Menu, uncheck the boxes for Hyper-V and Virtual Machine Platform, restart your computer, and test your emulator software again.
Best Practices After Enabling Virtualization
Activating low-level processor extensions requires maintaining proper system maintenance and software updates to ensure a stable, secure computing environment.
First, keep your virtualization platforms, container tools, and emulator software updated to their latest versions. Developers continuously optimize their engines to better align with the architecture updates of modern Intel Core and AMD Ryzen mobile processors, which helps prevent system crashes and blue-screen events.
Second, be mindful of your system resource allocations when configuring virtual environments. Enabling hardware virtualization allows guest operating systems to draw power directly from your physical hardware, meaning that assigning excessive RAM or CPU cores to a virtual machine can starve your host Windows operating system of needed resources, leading to system-wide slowdowns.
Finally, leave your firmware configuration panels unchanged once your virtualization settings are successfully enabled. Avoid adjusting advanced power states, memory clock profiles, or voltage settings unless you have specific technical expertise, as unexpected firmware changes can cause system instability or compromise data integrity.
Conclusion
Turning on hardware virtualization is a vital configuration step for unlocking the full capabilities of modern laptop processors, ensuring smooth performance for advanced development, testing, and emulation software. By understanding how to access your system’s BIOS or UEFI firmware and safely adjusting your processor’s hardware registers, you can easily remove the software blocks that cause performance drops and installation errors.
As software environments continue to move toward containerized architectures and isolated developer sandboxes, ensuring these hardware paths are open helps maintain a fast, stable, and versatile operating environment across all your computing tasks.
Frequently Asked Questions (FAQs)
What does hardware virtualization do?
It activates dedicated physical processing channels inside your CPU, allowing hypervisors, container tools, and emulation platforms to run multiple virtual environments at near-native execution speeds without relying on slow software translation layers.
Is it safe to enable hardware virtualization?
Yes. It is a native, factory-engineered hardware feature built directly into modern processors by Intel and AMD. Enabling it does not void your warranty, increase hardware degradation, or pose any physical risk to your laptop components.
Why is virtualization disabled by default?
Laptops often ship with this feature turned off to maintain maximum system security out of the box. Keeping these advanced processor registers closed by default reduces the potential attack surface, preventing unauthorized scripts or malware from attempting to deploy low-level, isolated virtual environments without user awareness.
Will enabling virtualization affect my battery life or daily performance?
No. Activating the setting simply unlocks the capability within the processor registers. It does not consume extra electricity or affect your laptop’s performance during normal daily tasks like web browsing, document editing, or media consumption. Additional power and resource usage only occur when you actively launch a virtual machine or emulator.
Do I need virtualization enabled for standard PC gaming?
No. Standard PC games that run natively on the Windows operating system do not require virtualization layers. You only need this feature active if you are utilizing specialized Android emulators to play mobile games on your laptop.